[SAML Test] 1. Setup a Single Sign On SAML Test Environment with Docker and NodeJS
IT/기타2020. 9. 7. 16:51
Setup a Single Sign On SAML Test Environment with Docker and NodeJS
I’m Jeffry Houser, a developer from the Polaris team in the content engineering group at Disney Streaming Services. My team builds…
medium.com
Defining Terms
The first time I was exposed to it; SAML was difficult for me to get my head around. As such, I’m going to start out with some definitions that will help you understand the pieces of a SAML application.
- Single Sign On (SSO): Any system that allows authentication code and login data to be shared across multiple applications.
- Security Assertion Markup Language (SAML): A framework, and XML schema, for implementing Single Sign On.
- Principal: The user who is attempting to gain access to our application.
- Assertions: Data about the principal which are included as part of the SAML response. Samples of this might be the user’s name, or other permission data.
- Service Provider (SP): This is the application, or system, that the user is attempting to access. We will build a simple SP as part of this article.
- Identity Provider (IdP): This is a remote application, or system, that authenticates the user and returns data back to the service provider. We’re not going to build an IdP from scratch, but I’ll show you how to set up and use a pre-built one.
- Globally Unique Identifier: A value that the IdP will use to identify an SP.
Knowing the definitions is a great start but knowing how these pieces work together is even more important and I’ll go over that next.
Review the Application Flow
This is a common flow for a SAML application:
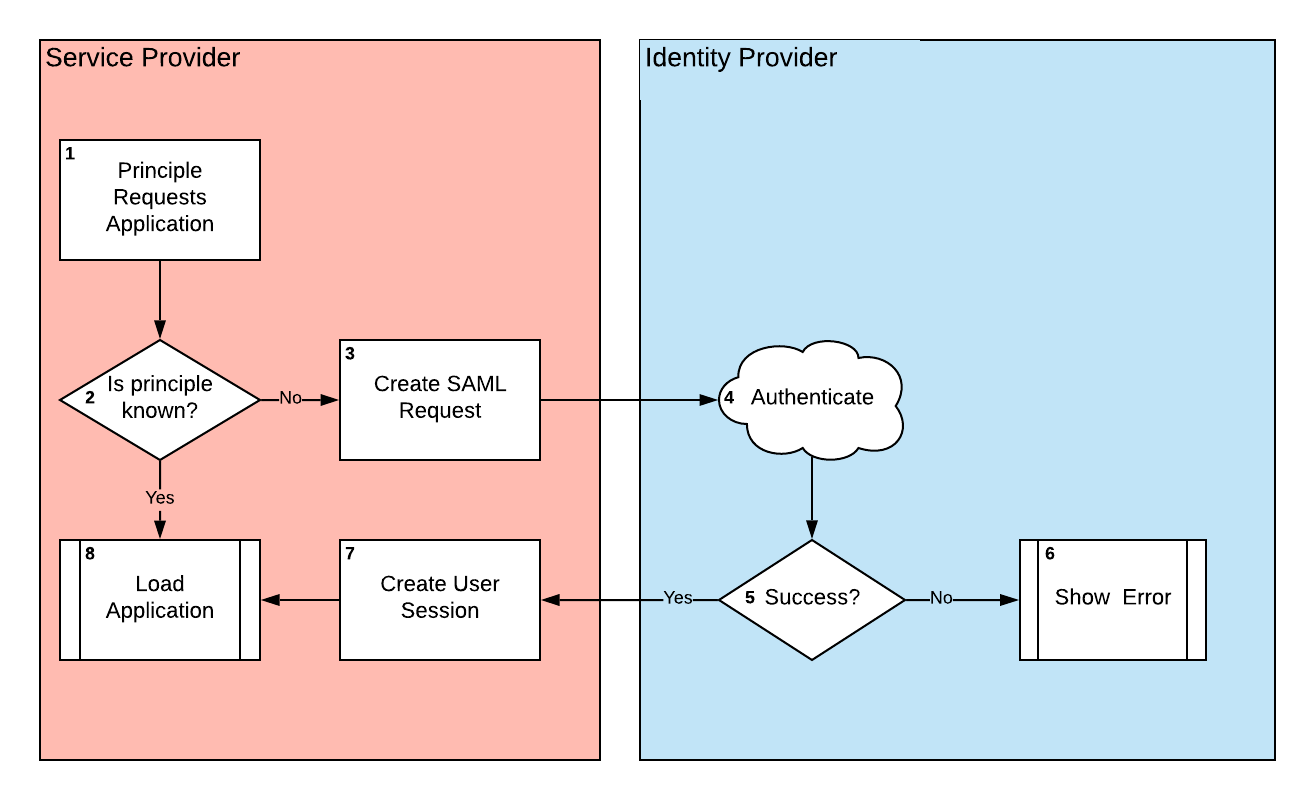
Let’s follow the flow:
- The Principal — AKA User — tries to access your Service Provider — AKA your application.
- The Service Provider checks to see if it knows the Principal. In a browser-based app, this session information would probably be stored as a cookie, but a desktop or application server may store that information in memory. If the user is known, we can load the app normally, so move onto step 8. If the user is not known, jump to step three to start the authentication process.
- If no user is known, the SP creates a SAML Request and sends that request to the IdP. This request will contain the Globally Unique Identifier so that the IdP knows which application the principal requested access to.
- Now the IdP handles the request. It will authenticate the user. It may do this based on an existing session from a previous sign in, or it may have the user login anew.
- Did the IdP successfully collect user details on the Principal? If so, go to step 7, the success set. Otherwise go to step 6 the failure step.
- If the Principal was not able to login, the IdP will handle authentication errors and the SP will know nothing about the failure.
- If the IdP successfully logged the user in, it will create a SAML response packet, including assertions about the user, and send the info back to the SP’s callback URL. The SP will use that data to create a user session.
- If the Principal authenticated properly, then load up the app and let them in.
The rest of this article will focus on steps 3 through 7.
Install Prerequisites
You’ll want to install a prerequisites before we start jumping into the code:
- Docker: Docker is a container platform that lets us easily create virtual machines with predefined code. We’re going to use it to easily create our own Identity Provider.
- NodeJS: We are going to write our Service Provider from scratch using a NodeJS and some common plugins.
- OpenSSL: OpenSSL can be used to create public and private key certificates for. Certs like these are often used for SSL on web sites, but we’re going to use them to encrypt and decrypt the packets we’re sharing between our SP and IdP.
'IT > 기타' 카테고리의 다른 글
| [SAML Test] 4. Service Provider 생성 및 테스트 (0) | 2020.09.07 |
|---|---|
| [SAML Test] 3. Setup our Identity Provider (Docker환경에 설치) (0) | 2020.09.07 |
| [SAML Test] 2. CentOS 8 nvm을 이용한 node.js 설치 (0) | 2020.09.07 |
| Jira API token 생성 (Issue does not exist or you do not have permission to see it) (0) | 2020.06.23 |
| Jira 설치 (docker) (0) | 2020.06.23 |
